Chaos Phoenix's Blog

By Hammer Chen, Gergana Lilkova

This is a kind of request tutorial. Many people have been asking me how I created a burning car in my previous "Burning Car RnD" video. It was done with fuel-based burning. The fuel starts to burn when the temperature reaches its ignition temperature. Fuel-based fire gives you a realistic burning effect; however, the fuel itself is a fluid, meaning the fuel will flow all over the surface. The overflow of fuels is harder to control and might cause undesired results.

In this tips & tricks article, I am going to show you an alternative method for creating a growing fire, based on an animated mask. The mask is generated with VRayDistanceTex from an animated box. Since we have full control over how far and how fast the mask expands, the fire is more directable than fuel-based. This method is more practical for production. That's why I prefer this technique.

Though I am using fire trails as an example, the same concept can be applied to many other burning effects - like a burning watchtower, a burning paper with the flame growing on a path of a letter, etc.

Overall setup. The fire is emitted from the plane on the ground. To control where the fluid is to be emitted, we place an animated box on top of the plane. The box is then added to the VRayDistanceTex object list. The VRayDistanceTex is a V-Ray specific procedural texture that returns a different color based on a point's distance to an object(s) specified in a selection list. So this procedural texture can be used in the mask slot of PHXSource. This way, we can direct the growth of fire simply by keyframing the box.

The box (22 X 38 X 568 cm) is animated in its height, with Noise Modifier on top, so the box can be used for the expanding of the fire as if it burns from one side of the plane to the other side. It is not necessary to be a box; it can be any geometry. We use box, in this case,  because we're going to create fire trails, and a box seems to be a natural decision for me.

Be sure to put the Box in the Exclude List in the Scene Interaction rollout of your Simulator. Otherwise, the geometry will disrupt your fluid simulation.

Fire / Smoke Source (PHXScource). For the fluid source, pick up the Plane in the scene. Put a VRayCompTex in the Mask slot. Set the Mask type to Texmap.

In the VRayCompTex, put a VRayDistanceTex in the Source A, and add Box001 in its Object list. This will generate a black-and-white mask for the PHXSource. To further make the mask more organic, we composite it with Source B - a procedural noise. In the end, you will have a growing mask as the image shown on left-bottom.

As for fluid simulation, beginners may find it is not easy to get the appearance of the fire they're after. Above is an image simulated with default dynamics and rendering settings. It is not bad but also it is not the type of fire we want in this case. There are several things you can do when creating small scale fire:

1. Use an appropriate conservation method in the Dynamics. The first thing to do is to change the conservation type. The default settings are Direct Symmetric + Multi-Pass, but they do not work for small scale fire. So we shift the conservation method to Direct Smooth and Backtrace for the Material Transfer. We also increase Steps Per Frame to 3, so we have a less noisy and smoother fire.

2. Gradient and Curve. Second, the curve in the Volumetric Options also plays an important role. Although the two images above look totally different, they are actually from the same simulation. The only difference is the curve and gradient in the Volumetric Settings. The default curve (left) creates an overexposure in the rendering, losing most of the details in the core of the fire; while the curve on the right shows details in the whole image. Notice the control point on the curve affecting the core strength of the fire and the corresponding color gradient at that position. With this curve and a custom-made gradient, we can have a flame without an over-exposure at its core (the highest temperature), as well as a realistic orange-yellow-blue color transitions.

3. Fire Opacity Modulation. The third thing is opacity modulation. This step might look trivial at first glance, but it affects the final look of your fire a lot. By default, the root of the fire appears too solid, and you can alleviate this problem by putting a VRayDsiatnceTex in the Modulate slot.
In the Objects list for the VRayDistanceTex, we add Plane001. This produces a mask modulating fire opacity at its root, and you get a more realistic fire by doing so. If the fire is set on a car hood, then you should put the hood bonnet geometry in the object list instead of a Plane. You get the idea.

4. PHXTurbulence. If you like your fire more energetic, you can add a turbulence force in the scene. With the right amount of Strength and appropriate size, the force will push the fire around, giving it an extra level of realism. Of course, if you like your fire more gentle, you can skip this step.Notice that I have also put a Plain Force act as a wind blowing the fire, but it is optional.

Final Results:


Another example with an extra bitmap (logo) composited in the mask for PHXSource:


Download the fire trails scene
The scene file for fire trails is rather small, and the setup is compact. As this article is not written in a step-by-step fashion, to make your life easier, you can click here to download the file and explore the scene yourself. Volumetric Setting file (*.tpr) file is also included. Happy sim and enjoy!

By Hammer Chen, Kristin Ivanova

In this article, I show how to create a fruit explosion with Phoenix FD for 3ds Max. The fruit explosion consists of two fruits colliding at a high speed, then they smash and their juices splash out.

For the purpose of illustrating this article, we’ve shaded the fruits to get a tomato-ye look. However, the shape and shaders of the two geometries can be customized to your liking to get whatever kind of fruit you want to smash We don’t focus on the shading information of the fruits here..

The most challenging part of this animation is the fruit mesh smashing. Instead of softbody or cloth simulation, I use 3ds Max's Morpher Modifier and keyframe the splitting fruit meshes. I avoid using any softbody/cloth simulation in this tutorial, because it is difficult to control the results. By keyframing the animation, you have full control and are able to add layers of detail.

Since the mesh motion purely relies on keyframe animation, it is crucial to find the right reference footage to align with. You could search for keywords like "high speed fruit" or "fruit explosion." Or you can go through any stock footage sites. Once you find a good footage, load it in 3ds Max. This way, you can align your keyframe animation to the footage in the viewport accurately.


1. Fruit geometry deformation
Based on observation from reference videos, I concluded that one basic fruit mesh and four different deformed meshes would be enough to recreate the fruit splitting effect. Start from modeling the basic shape. The fruit is modified from a simple sphere and the mesh is split as shown in the image above. All other four deformed meshes are derived from this basic mesh. This is to make sure all five geometries have the same topology and can be used as morph targets later.


We duplicate the basic mesh into four other meshes.. By moving the vertices or adding modifiers on top, we create four different deformed fruit meshes: split, bump_shape, dent, and FFD_deformed. These four geometries represent the various stages of changing the shape of the fruit during the collision. Add a Morpher modifier to the basic mesh and load up the four geometries as morph targets.

The above image shows the curves of four morph targets in the Curve Editor. At frame 15, the fruits collide. By mixing the various target shapes, we mimic the smashing effect when the two fruits collide, deform and rupture.

Beside the Morpher modifier, we add a Ripple modifier on top to get subtle oscillations when the fruits collide. Then, we keyframe the Ripple to emulate the effect.To randomize the motion and shape, we add an FFD3X3X3 modifier and set the keyframe to its Control Points. Then, we add a Shell modifier which enables the liquid to collide with the fruit meshes.

Once the single fruit is ready, we duplicate and rotate it, and then slightly shuffle the parameters in the Modifier stacks, so that the two don't look the same.

When the two fruits collide, we have to note that there must be one fruit that pushes the other. In this case, we assume that the fruit on the left side is stronger. We create a Dummy helper in the scene. Both fruits are linked to dummy. When they collide, set the key of the dummy so that the two appear moving together.

Final keyframed animation


2. Fluid Simulation 
Now that the fruit mesh animation is done, we're ready for the next stage - fluid simulation. Let’s put two ring-like geometries inside the two fruits (displayed as See-Through). These two ring meshes are added to the Liquid Source’s Emitter Nodes list.

In the real physical world, the juice (pulp) is packed full inside the fruit and it pops out when they collide. We don’t use the Phoenix FD Properties/Initial Fill to fill the fruit. Initial Fill, provides less control over the liquid leaking problem. Instead, we use a ring-shaped object to emit liquid. This way it is easier to control the fluid, especially when you have a fast-moving object . 


Keyframe the Outgoing Velocity so that it emits liquid from frame 9 and then stops at frame 15. This way we get an intense burst of juice when the fruits collide.

System Unit and Simulation Grid: The Cell size of the Liquid Simulator here is 0.64cm. Enable the Adaptive Grid option. In the real world, regular fruit size is in centimeters range; therefore, we set our 3ds Max System Scene Scale to Centimeter. Our fruit size is 50 cm in diameter. This is one giant fruit. We deliberately make it big because with a large object you get longer distance for fluid and mesh to run, which makes it more manageable when adjusting the effect.

Dynamics: Because gravity is not necessary in this case, let’s set its value to very low. The fruit moves fast, so increase the value of the SPF. I have set the Viscosity and Surface Tension to small amounts to give the liquid a little viscous look. Keyframe the Time Scale, so that we get a bullet-time effect when the fruits explode.

The curve shown is how we keyframe the Time Scale, so after the simulation, we have an exploding fluid that moves slowly over time.

Left: without Mesh Smoothness enabled; Right: with Mesh Smoothness enabled. For Mesh Smoothing, set the Smoothness to 10 and the Particle Size to 0.5.

Fluid simulation results


Final results


Download the Scene files
As a user, I know it's always handy to have the scene when following a tutorial. Here we provide you with the final scene to start with. Please note that the HDR image is not included among the assets in the zip file, so you may find differences with the final images. Feel free to insert your own  HDRI  into the V-Ray Dome light. Click HERE to download. Enjoy!

By Hammer Chen

In this article, I am going to show you some of the critical steps of making this burning motorcycle image with Phoenix FD.


The model was kindly provided by Lien Ying-Te. Though this is a sub-D model, there are a lot of parts and faces in the geometry. The first thing I do is attach all the pieces into one single mesh, and then use ProOptimizer to reduce the polyfaces to roughly 10% of its original polycounts. You get a significant simulation performance increase when you have fewer polycounts as a fire/smoke source.


The next step is to determine which parts of the motorcycle to be burned. I prefer using  vertex color as a mask to control where the geometry emits fire/smoke. So I add a VertexPaint modifier to the low-res motorcycle model, and then I paint the faces of the tires and the motor engine white. You can find the same technique explained in details in this official tutorial page.

Now create a Phoenix FD Fire / Smoke source in the scene, and add the motorcycle (motor_collpase) in the emitter nodes list. For the Mask, use Vertex Color texture.

If you simulate the fire with Phoenix FD Simulator, you may get something like the upper left image. Notice that the "root" of the fire looks ugly and unrealistic. How can we get a smooth fire transition like that in the image on the right? The answer is in the Phoenix FD Volumetric Render Settings - fire/smoke modulation.

Check the Modulate option. Put a VRayDistanceTex in both the Fire and the Smoke Opacity Texture slots. It is a V-Ray specific procedural texture that returns a different color based on a point's distance to an object(s) specified in a selection list. Simply put, the part of fire that is closer to the motorcycle geometry will have less opacity. We can use this texture to alleviate the "root" artifact in the fire.

The image above shows the settings for the VRayDistanceTex. Add the motorcycle geometry in the Objects list. The distance can control how far the transition will be. In this case, I use the value of 2.5.


Final animation.

Too complicated? Don't worry. I have made a simplified version of the scene, click Here to download the 3dsMax scene. Hope you like this post. See you next time!

By Hammer Chen

In this article I am going to show you the benefit of using Phoenix FD in tandem with VRayVolumeGrid. I will use a nuclear explosion as an example.

Phoenix FD is capable of simulating complex explosions, such as air strike, small or large scale explosion. For a realistic blast, it always involves many different components. For example, the nuclear explosion you have a major mushroom cloud that flies into the sky; and the ground dust triggered by the mushroom cloud explosion. With multiple fire/smoke sources, Phoenix FD can perform realistic nuclear explosion simulation. In fact, you can find a downloadable nuclear explosion scene on the ChaosGroup official sample page.

With that said, what if you want extra degree of freedoms for tweaking and shaping the extract nuke you want. Simulating each component separately might be a way to go. I'll explain why.

A collection of reference images from the Internet

Let’s take a look at physical reality. A nuclear bomb was placed on the ground, somewhere in an unknown desert. When the bomb blast off, initiate the chain reaction, heat climbing and generate lots of smoke as a by-product the chemical reaction; that major explosion pushes the ground dust which is already there before the blast. We can say the physical properties of those two elements (the ground dust and explosive mushroom) are no doubt different things.

Though with individual Phoenix FD Fire / Smoke sources, you can assign different smoke amount, temperature for each sources, they are shared many other properties in one Simulator – smoke buoyancy, conservation quality..etc.

Two components of a nuclear explosion. (a)Mushroom with a skirt shape (b)Ground dust

Though simulating every component in one single simulator give you more coherent results; It is more difficult to get the exact shape and timing you're looking for. Because the shared properties, the simulation of Mushroom and Ground dust are constrained with each other, every time you want to tweak one feature in the Simulator for one of the components, effect the others; On the other hand, if you simulate them separately, that unshackle us from the constraints. We can get the right looking more easily, or we can squeeze more juices out of current settings which already good.

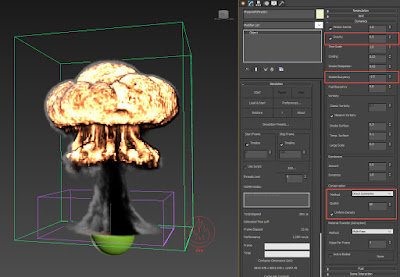
Simulator settings for "The Mushroom"

(A)Mushroom cloud: High temperature and smoke are emitted from a sphere. The value of gravity and Smoke Buoyancy was tailored for "The Mushroom” in the Simulator, in favor of nurturing the shape we desired. In this case, I set the Gravity to 0.5 and Smoke Buoyancy to -1.0. The simulation was retimed by 30% of its original speed through process of resimulation. I take advantage of Phoenix FD’s “precise tracing” technique for a flicker-free slow motion effect.

Simulator settings for "Ground Dust." Noted several spheres were deliberately scattered on the ground to break symmetry.

(B)The ground dust: I use PFlow as my smoke source. You can check my previous post for the basic setup. I leave gravity and smoke buoyancy as default. But I retimed the sequence by 70% of the original speed through resimulation.


The Mushroom
Ground Dust
Cell size
55.51cm
1.25 cm
Source
A sphere
PFlow
Gravity
0.5
1.0
Smoke Buoyancy
-1.0
0.0
Conservation Quality
80
40
Retiming (of original speed)
30%
70%
Resimulation, Amp. Resolution
0.5
0.2
Final grid dimension
338 X 326 X 510
668 X 716 X 102
Mushroom & Ground Dust setting comparisons


Once two *.aur caches have loaded into two vrayvolumegrids. The grid for ground dust was scaling up slightly, so you get triangle composition that matches the reference image. 

After we have finished the simulation of Mushroom and Ground Dust, we can import them (*.aur caches) into two vrayvolumegrids and put them in one scene. We can start our “3D composite” in 3dsmax. Since the volumetric data now loaded into vrayvolumegrids, that means we can:

  • scale them up or down
  • rotate them to give the best looking
  • offset the animation
VRayVolumeGrid gives you the option for offsetting the simulation caches.

Besides spacial manipulation, we can offset the sequences to get the best combination temporal-wise. 


Above is the final rendering of the nuclear effect, I hope you enjoy this post and happy simulating!

(Noted, you can just use Phoenix simulator directly and skip the loading inside of the VRayVolumeGrid. The Simulator and VRayVolumeGrid are exactly the same except the VRayVolumeGrid has the simulation settings stripped down. However, with VRayVolumeGrid you won't accidentally ruin the simulation by clicking on wrong buttons. Besides, you can give your collague when they don’t have Phoenix FD installed.)


By Hammer Chen

This tutorial is requested by one of our users who said that it was difficult to create a shockwave with Phoenix FD. Here, I am going to explain the critical step that he might miss.

This is my scene setup: a Pflow (PF Source) in the middle, spreading out particles horizontally; a PhoenixFD Fire / Smoke Simulator; and a Phoenix FD Fire / Smoke Source (PHXSource) that picked up the PF Source in the scene.

I like to use the PFlow in this case because of the "Random horizontal” option, which allows you to emit particles horizontally. This is perfect for making a shockwave.

However, if you pick this PFlow as your smoke source and run a simulation with the default settings, you may end up like the image above even if you set your particle speed very high.

The key step is to tick the Motion Vel. option of your Phoenix fire/smoke source. Enabling it will allow the smoke to inherit velocity from the PFlow.

In addition to enabling the Motion Vel., you may want to crank up the value to get the right look of the shockwave.


One final word. To enhance the turbulence details for the fast-moving particle source, you can increase the Simulator's conservation quality and set the Steps Per Frame to 2.
Newer Posts Older Posts Home
  • Home

Search This Blog

Categories

3dsMax Nightly Svetlin Nikolov tips & tricks video tutorial

Recent Posts

Powered by Blogger.

Blog Archive

  • ►  2022 (2)
    • ►  July (1)
    • ►  January (1)
  • ►  2021 (2)
    • ►  September (1)
    • ►  January (1)
  • ►  2020 (2)
    • ►  September (1)
    • ►  March (1)
  • ▼  2019 (5)
    • ▼  July (1)
      • Making of Fire Trails
    • ►  June (1)
      • Making of Fruit Explosion
    • ►  April (2)
      • Making of a Burning Motorcycle
      • VRayVolumeGrid and Nuclear Explosion
    • ►  January (1)
      • Creating a shockwave with Phoenix FD
  • ►  2018 (8)
    • ►  December (2)
    • ►  November (1)
    • ►  October (1)
    • ►  September (1)
    • ►  May (1)
    • ►  March (2)
  • ►  2017 (8)
    • ►  November (3)
    • ►  September (5)

LINKS

  • Phoenix for Maya QuickStart videos
  • Phoenix for 3dsMax QuickStart videos
  • Documentation Page
  • Official Forum
  • Official Tutorial page
  • Phoenix Facebook Group
  • Phoenix Vimeo Group
  • Ivaylo Katev's vimeo
  • Svetlin Nikolov's youtube

Copyright © 2015 Chaos Phoenix's Blog . Designed by #