Chaos Phoenix's Blog


By Hammer Chen, Kristina Gaytandzhieva, Kristin Ivanova

This scene is actually a small test I did back in 2018, for variable viscosity - a new feature of Phoenix 3.10 at the time. I found this scene in my drive while I was looking for my previous works. Some people liked it, so I decided to share how I set up the scene.


Final animation


Scene setup
The simulation setup consists of a highly viscous liquid which is emitted from a teapot.
The emission was masked by using a Stucco texture, so the yellow-slimy liquid seemed to come out from small pores on the teapot. I used the same texture to map the viscosity of the Liquid source. To make the animation more interesting, I assigned a Waveform controller to the Outgoing Velocity of the liquid source. A V-Ray Dome light was used for the lighting, the HDRI is from Chaos Cosmos (Studio 002).


Simulator’s Output
Before you run a fluid simulation, be sure to  enable the  options shown above in the Output section of the Liquid Simulator. Otherwise, you won’t see the viscous effect on the liquid.


Fluid Source
As a 3ds Max user, a teapot is my go-to geometry when testing a new feature. I used it as my liquid source. Then I masked it with a Stucco texture, so the fluid only emits from the white areas of the texture. This makes it appear as though the fluid is being emitted from tiny pores on the surface of the teapot.. 

As for the variable viscosity - I used the same Stucco texture to map the viscosity. From hindsight, you can skip mapping the viscosity. You can simply enable the Viscosity option of the LiquidSrc, with the value set to 1.0. It should be enough to achieve interesting results. Or, you can try different procedural textures to map the viscosity.


Preview the Viscosity
If you like, you can preview the viscosity by checking the option "Viscosity" in the Preview section of the Simulator. As you can see in the color-coded particle preview, by mapping the Liquid Source's viscosity with a Stucco map, we can introduce various viscosity simulations inside of the liquid. 


Animate the Outgoing Velocity of the LiquidSrc
I assigned a Waveform controller to the Outgoing Velocity of the LiquidSrc. Set the Vertical Bias to Auto > 0. Combine it with the translucent, sub-scattering shader and you’ll make  the shot much more fun to watch. This is the most critical step of the scene setup, in my opinion.


Dynamics
Because the liquid runs out so fast, I increased the Steps Per Frame to 2, so we can have a smoother, connected-liquid mesh. I lowered the Gravity to 0.1, so the liquid can emit higher. I also decreased the Time Scale to 0.5 for aesthetic reasons, allowing the viewer to see the effect better.
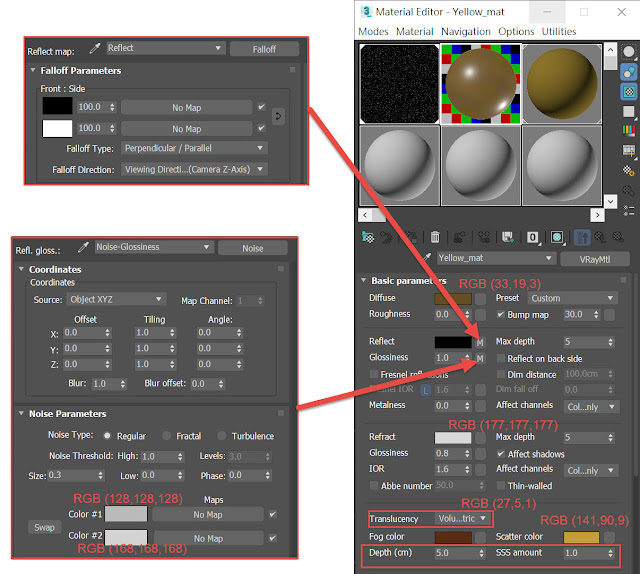


Material for the shitty liquid
It was made with a standard V-Ray material. You can find the material in the downloadable scene file.


Lighting
The lighting is very basic. I used a V-Ray Dome light, the HDRI is from Chaos Cosmos's HDRIs - Studio 002. (Cosmos is a new asset database that comes free with some V-Ray integrations , so I gave it a try).

Download the scene file
Click Here to download the scene file (3ds max 2017). Note that the package does not include the HDRI map. Enjoy!


By Hammer Chen, Kristin Ivanova

Phoenix FD 4's new feature TexUVW opens a great opportunity for adding details to your fluids. It allows fluids to transport UVW information along with the moving fluid. You can find an example in the "Using TexUVW for Creating Thin Smoke" tutorial, available on the Phoenix FD official page. In the tutorial, smoke opacity is masked with a noise texture, with the help of TexUVW, to enhance the details that mimic thin smoke. 

In this article, we are taking advantage of this new feature in order to create a lava flow. The folding character of the lava is generated through bump maps and displacement.


References
When creating a lava stream, we need to consider what type of lava we want to use for reference. A variety of lava types exist depending on terrain, speed, hotness, and material composition. For the purpose of this article, we will create a "pahoehoe"  (pronounced 'paw-hoey-hoey") type of lava (see the reference images above), which creates folds as it moves. However, if you intend to simulate molten lava, you can check the "Solidifying of Molten Lava" tutorial on the official documentation site.


Scene setup
The simulation setup consists of the following:  a highly viscous liquid is emitted from Plane001, flowing down the slope of the Ground_Plane (with a Shelled Modifier applied). The flow then collides with several rocks, creating patterns in its TexUVW. Based on the animated TexUVW that follows the flow, we can then apply diffuse maps, bump maps and displacement to it.


Fluid Source
The liquid source is quite simply a standard plane. We mask the source with Stucco Texture, so the emission is not too uniform. A Noise modifier is added to the plane and set to animated. This way the liquid flows in different directions and varies in speed, making the lava collide with itself, generating interesting patterns in its UVs.

Since a plane with no thickness might not voxelize well when running the simulation, a shell modifier is added to Plane001. Then, we select one side of the plane and set the face IDs to ID 2. That's why we set the Polygon ID to 2 in the Liquid source. 

Another useful option of the Liquid Source is the "Inherit TexUVW From Geom". It sets the UVW Grid Channel value for each cell where fluid is emitted to the UV value of the emission geometry in that cell. When combined with the Variation option, it allows you to create an animated UVW pattern. If you are unsure of what it actually does, you can find an example here. 


Liquid Simulator
The first thing to look at here is the "Texture UVW". Be sure to enable the "Texture UVW" channel data in the Output rollout. Otherwise, the liquid won't contain any TexUVW information after simulation. 

The second thing you'll notice is the extremely low value of the Time Scale. This is because we want a slow moving lava flow. We also give some value to the Default Viscosity and Surface Tension options, as these two physical properties simulate thick and viscous liquids like lava.

The third important parameter is the Texture UVW Interpolation. In this example, we give it a value of 0.001. This parameter controls the frequency of Phoenix snapshotting the liquid mesh for UVW. When the Interpolation is set to zero, the TexUVW is determined in the first frame and continues to stretch over time, never to snapshot again. When the Interpolation is more than zero (0.1 for example), Phoenix snapshots the liquid mesh over a period of time and updates its TexUVW. The following table shows the Pros and Cons of these two extreme conditions. We choose in-between values (0.001) in this article for balanced results.


Other settings: SPF set to 2 for a more rounded thick liquid, it is okay to set SPF to 1 for a faster simulation. The Scene Scale is set to 8 for the same reason: the liquid appears thicker with a higher Scene Scale.

When the Interpolation is set to 0.1, as you can see, the TexUVW is less stretched. However, there is no realistic folding pattern that is usually seen in the "pahoehoe" lava. This setting is less expensive for computing, since you can run a rather low grid resolution and still get usable results.

When the Interpolation is set to 0.001, you can see patterns in the TexUVW, suitable for the "pahoehoe" type of lava. We still give the Interpolation a teeny tiny value instead of zero for balanced results. Notice we also up-res grid resolution in this example.

When applying a checker texture, you can see that  the leading edge of the liquid begins to update its TexUVW. So we set the Interpolation to 0.001 to avoid super overstretch of the UVs, hence, noisy mesh when we add VRayDisplacementMod to the liquid mesh.


Shading
The main topic of this article is TexUVW and we don't want to make it overly complicated. The whole idea of the shading network is simple: we have hot lava material and cold lava material, the two are blended with a VRayDistance Texture map as a mask (as shown in the image above).The hot lava is made of VRayLightMtl and the cold lava is made of standard VRayMaterial. So when the lava touches the rocks in the scene, it appears red hot, while other parts of the lava remain as cold and black. You can also add the ground plane in the VRayDistanceTex Objects list if you like to. The complete shading network can be found in the downloadable scene here.

To keep the scene simple, we don't use a Particle Turner, which allows you to manipulate liquid viscosity when particles age. However, when Particle Turner is used with PhoenixFDGrid Tex, you can get even more realistic molten lava, both in behavior and shading. That is worth another post or tutorial.


On top of the Phoenix FD liquid simulator we add VRayDisplacementMod. This modifier can turn the smooth mesh into a detailed one and make the pahoehoe lava mesh much more convincing.

Above are some images showing a variety of lighting conditions, different strengths of the applied displacement, and different TexUVW interpolation values. You can see distinct characters among them.

Final animation

Downable scene. Click here to download the final scene. Note that the texture maps and HDRI maps are not included in the package. You can download the texture maps from textures.com, and the HDRI maps from HDRI Heaven.
Newer Posts Older Posts Home
  • Home

Search This Blog

Categories

3dsMax Nightly Svetlin Nikolov tips & tricks video tutorial

Recent Posts

Powered by Blogger.

Blog Archive

  • ►  2022 (2)
    • ►  July (1)
    • ►  January (1)
  • ▼  2021 (2)
    • ▼  September (1)
      • Variable viscosity
    • ►  January (1)
      • Making of Lava Flow with TexUVW
  • ►  2020 (2)
    • ►  September (1)
    • ►  March (1)
  • ►  2019 (5)
    • ►  July (1)
    • ►  June (1)
    • ►  April (2)
    • ►  January (1)
  • ►  2018 (8)
    • ►  December (2)
    • ►  November (1)
    • ►  October (1)
    • ►  September (1)
    • ►  May (1)
    • ►  March (2)
  • ►  2017 (8)
    • ►  November (3)
    • ►  September (5)

LINKS

  • Phoenix for Maya QuickStart videos
  • Phoenix for 3dsMax QuickStart videos
  • Documentation Page
  • Official Forum
  • Official Tutorial page
  • Phoenix Facebook Group
  • Phoenix Vimeo Group
  • Ivaylo Katev's vimeo
  • Svetlin Nikolov's youtube

Copyright © 2015 Chaos Phoenix's Blog . Designed by #