Chaos Phoenix's Blog

by Hammer Chen

Ever wanted to create high-speed fruit splashes photography in 3dsMax? With Phoenix FD, it might be much easier than you thought.

A. Rigid body dynamics with PFlow
Once your 3D fruit geometry is ready, import it into your scene and layout your objects like this:

You could create a basic MassFX Pflow by right click on your PFlow / New / mParticles Flow

In the Shape Instance Operator, add your fruits (could be strawberry or banana or whatever)

For the mP Shape operator, use "Convex Hull" for more accurate rigid body dynamics.


mP Buoyancy operator is handy, you could use it as your water plane, simulating your fruits floating on water surface. Pick up the Plane in your scene.

Uncheck Ground Collision Plane in the mP world operator, because we don't need a ground plane in this case.

Play your PFlow, once you satisfy with the results use PFlowBaker maxscript to bake out your fruits as animated keyframed geometry. Now we are ready to sim our liquid with Phoenix FD.

B. Simulate liquid with Phoenix FD
Here is our overall setup for Phoenix FD


For more dramatic splashes, right click on each of your fruit geometry and set it's Phoenix FD properties / Motion Velocity Effect to a larger value.
Left: Motion Velocity Effect = 1 ; Right: Motion Velocity Effect = 2

In the Phoenix FD / Rendering, use Cap Mesh mode instead of Mesh. Cap Mesh is better for fruit splashes cause it doesn't generate unwanted reflection/refraction from the side of the liquid body.
Left: Mesh Mode; Right: Cap Mesh Mode


Finally, use PhoenixFDOceanTex to displace your water surface, give it a wavy looks.


Left: without displacement; Right: with displacement

More rendering results


Enjoy making splashes ;)

by Hammer Chen

Do you know you can create realistic cloud by simply budding off smoke from a single plane? The key is using the right mask and scattering setting.

Here we have one 3dsMax plane primitive as Fire / Smoke source. (Please note that Phoenix FD doesn't like non-closed geometry. If you having any trouble emitting fluid from a plane, add a shell modifier to the plane can fix the issue)


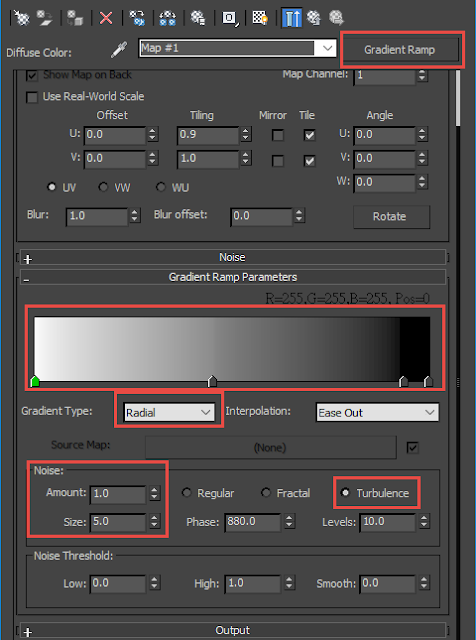
Here is the key step. Add a Gradient Ramp texture in the Mask. Set the mask type as "Texmap"


Here is my setting for the Gradient Ramp. This will create a noisy Radial shape on the plane. As the image below:


Animate the outgoing velocity of your Fire/Smoke source a few frames, allowing smoke puff out from the plane, forming cloud-like shape.

Here is my Dynamics setting of the Simulator.

For the rendering, it is important to set your Scattering as "Ray-Tranced" to get realistic cloud rendering.

Left: approximate + Shadows; Right: Ray-Tranced scattering


You could generate different cloud by using different texture as a mask.

Enjoy making clouds with Phoenix FD :)

For a more detail, steps by steps tutorial, please check this link on ChaosGroup official help page.
Newer Posts Older Posts Home
  • Home

Search This Blog

Categories

3dsMax Nightly Svetlin Nikolov tips & tricks video tutorial

Recent Posts

Powered by Blogger.

Blog Archive

  • ►  2022 (2)
    • ►  July (1)
    • ►  January (1)
  • ►  2021 (2)
    • ►  September (1)
    • ►  January (1)
  • ►  2020 (2)
    • ►  September (1)
    • ►  March (1)
  • ►  2019 (5)
    • ►  July (1)
    • ►  June (1)
    • ►  April (2)
    • ►  January (1)
  • ▼  2018 (8)
    • ►  December (2)
    • ►  November (1)
    • ►  October (1)
    • ►  September (1)
    • ►  May (1)
    • ▼  March (2)
      • Fruit splashes with Phoenix FD
      • Making clouds with Phoenix FD
  • ►  2017 (8)
    • ►  November (3)
    • ►  September (5)

LINKS

  • Phoenix for Maya QuickStart videos
  • Phoenix for 3dsMax QuickStart videos
  • Documentation Page
  • Official Forum
  • Official Tutorial page
  • Phoenix Facebook Group
  • Phoenix Vimeo Group
  • Ivaylo Katev's vimeo
  • Svetlin Nikolov's youtube

Copyright © 2015 Chaos Phoenix's Blog . Designed by #