Making clouds with Phoenix FD
by Hammer Chen
Do you know you can create realistic cloud by simply budding off smoke from a single plane? The key is using the right mask and scattering setting.
Here we have one 3dsMax plane primitive as Fire / Smoke source. (Please note that Phoenix FD doesn't like non-closed geometry. If you having any trouble emitting fluid from a plane, add a shell modifier to the plane can fix the issue)
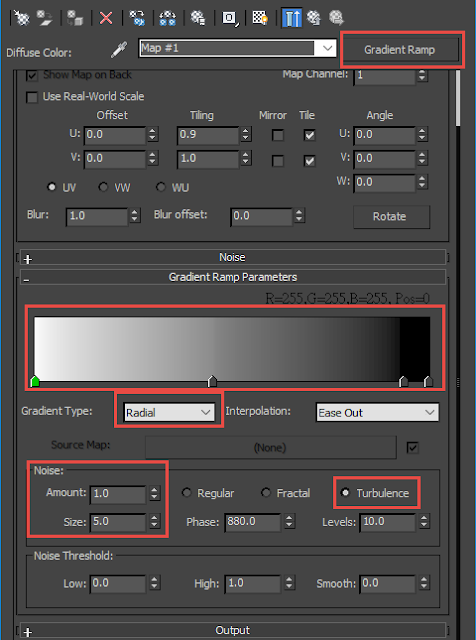
Here is the key step. Add a Gradient Ramp texture in the Mask. Set the mask type as "Texmap"

Here is my setting for the Gradient Ramp. This will create a noisy Radial shape on the plane. As the image below:
Animate the outgoing velocity of your Fire/Smoke source a few frames, allowing smoke puff out from the plane, forming cloud-like shape.
Here is my Dynamics setting of the Simulator.
For the rendering, it is important to set your Scattering as "Ray-Tranced" to get realistic cloud rendering.
Left: approximate + Shadows; Right: Ray-Tranced scattering
You could generate different cloud by using different texture as a mask.
Enjoy making clouds with Phoenix FD :)
For a more detail, steps by steps tutorial, please check this link on ChaosGroup official help page.
Tags:
3dsMax
tips & tricks


3 comments
April 2018 cute calendarand nice calendar images – Download free Printable April 2018 cute calendar templates, Images and Photo PDF, Word, Excel, Jpg, Png – Create and download printable calendar Easy to print online.
ReplyDeleteI really like it your article. catalogspot.com
ReplyDeleteThank You for great tutorial. I have a question. How to achieve best quality effect in high resolution image. I noticed the Phoenix clouds and smoke looks fantastic but in low res. But in high resolution (like over 6000px) these elements look very grainy and with little detail. Is the grid resolution the only solution?
ReplyDeleteThank You
Piotr