Car Explosion with Phoenix and thinkingParticles

By Hammer Chen, Kristin Ivanova
In this article I put everything I learned about thinkingParticles and Phoenix explosions together. Car explosion is my go-to scene setup as it contains some key components:
- Car rigid body simulation: hinges joint for car doors and spring joint for car suspension
- VolumeBreaker for shattering glasses
- Fire and explosion with Chaos Phoenix, using thinkingParticles; particles are used as fluid sources.
Once again, with this setup I cover all the essential components for a basic but convincing car explosion.
Final animation
Here are the key steps for setting up the scene. Though I use thinkingParticles for the particles/dynamics effects, the concept is applicable even when using other particle systems such as PFlow or tyFlow, for some parts of the scene setup at least.
Although the tips and tricks I convey here are pretty straightforward, the actual setup can be rather complex. You need some basic knowledge of thinkingParticles and Phoenix to begin with.

A Solid car model

Car interior
The car interior is basic. It's needed only so when it explodes, to have something burning on the inside.

Vehicle Dynamics


tP's Particles as Fluid Sources
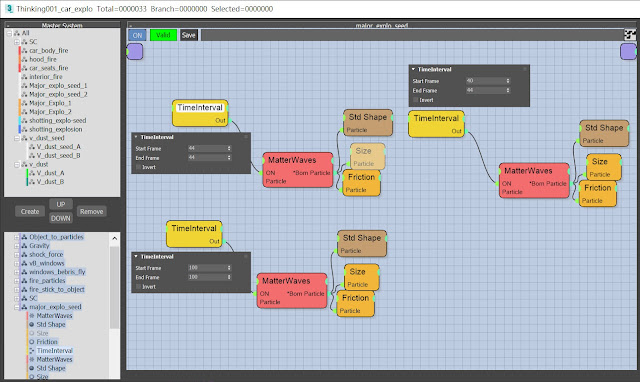
Directability is very important in every FX setup. Not only can we decide where the center of an explosion is, we can also control when to trigger the blasts. The screenshot above shows the two explosions controlled by Time Interval condition in tP. In this car explosion animation, the first blast happens at frame 44, then is followed by a smaller blast at frame 100. Through that degree of control over the particles, we can orchestrate the explosion both spatially and temporally.

Time Base for Procedural Pyro effect

Smoke with different colors enhances realism
Variation in the smoke color can enhance visual realism. That's why we generate two sets of dust particles (v_dust_A and v_dust_B), each one used for two Fire/Smoke sources that are set to different RGB colors. Again, this idea is borrowed from the Artillery Explosion tutorial.

Particle-based Fire Emission
Some of you may notice that we already have many posts about making fire: Making of a Burning Motorcycle, Making of Fire Trails, and Large Scale Fire with Phoenix. All those articles are about geometry-based fire emission. Here we demonstrate an alternative method: a geometry (i.e.: car seats) is used as a source for particles, then those particles are used to emit fire/smoke. Particle-based fire emission can be more flexible than geometry-based emission. That is because control over how strong the fire is depends on the number of source particles, and how long the particles last, controls the life of the fire.
The screenshot above shows particles for car_body, car_seats_fire, interior_fire, and hood_fire used as PHXSource_fire emitter nodes.


Volumetric Render Setting that work for both Fire and Explosion

Comparison images for different source temperature
See how temperature from the fluid source plays an important role in the proper exposition of the fire. When the temperature is set to 1800, it shows more details in its hottest parts.


Modulate the Fire with VRayDistanceTex
This is one of my oldest tricks: modulate the fire with a VRayDistanceTex. You can find more information in my previous article: Making of Fire Trails. To add particles that represent car parts to the VRayDistanceTex Objects list, enable the "Group as Objects" option in tP. This option allows Phoenix to treat tP’s particle groups as geometry.
Other critical parameters in the Volumetric Render Settings are as follows:
- Self-shadowing set to Ray-traced for better scattering
- The Light Power on Self, Light Power on Scene, and Fire Multiplier fine-tuned for the scene, in order to fit the look I am after
You can tweak those parameters to your preferences.
Color correct with Filmic Tonemapping
Last but not least, it is always a good idea to use filmic tonemapping in the V-Ray Frame Buffer. This post-process can squeeze out more details in the rendered fire. The Filmic Tonemap allows to simulate film's response to light, so this enhances the overall realism of the final images, too.
Download the scene files
Alright, those are my tips and tricks for the Car Explosion scene. Though this is a low-poly car, the whole scene setup can be relatively complex, so I know it would be helpful if I just share the scene file. You can download it from this link.
Please note you need cebas thinkingParticles 6 and Chaos Phoenix 4 for 3ds Max in order to run the scene. The HDRI lighting in the scene is using an HDR map from Chaos Cosmos. Enjoy~
Tags:
3dsMax
tips & tricks
3 comments
The “Car Explosion with Phoenix and thinkingParticles” project is an impressive demonstration of simulation and visual effects. Watching the way the explosion interacts with the environment really highlights the power of modern digital tools in creating realistic and dynamic car effects. It’s inspiring for anyone interested in VFX or 3D animation.
ReplyDeleteEven with virtual cars, tyre issues in real life can still catch you off guard. That’s why having access to a reliable tyre leak repair service is so valuable. Quick professional support ensures your vehicle stays safe and road-ready whenever you need it.
Your company’s reputation for excellence with premium brands is well-earned. The attention to detail you provide ensures that every vehicle leaves your shop looking like new again. collision repair in Hollywood
ReplyDeleteThanks a lot for sharing this amazing knowledge with us. This site is fantastic. I always find great knowledge from it.
ReplyDeleteParadise automotive service