This is a short video recorded by Svetlin, showing you how to render velocity field on a surface with Phoenix FD 3.04 Nightly. More detail discussion, check out Phoenix FD Facebook group.
by Hammer Chen
Phoenix FD allows you to mix the liquid with different RGB color, chocolate, and milk for example. Here are few steps you can follow:
1. Out Grid RGB Channel
2. Set two of your LiquidSrc with different RGB color. In this particular example, I set my milk LiquidSrc with black RGB color and white for chocolate.
Material for milk
Material for chocolate
Using VRayBlend to blend the two materials above, the key is what texture we can use when mixing the two?
PhoenixFDTexmap is the answer. Pick up your Source node "PhoenixFDLiquid" in the scene, and set your Channel as "RGB."
This image is the mask generated by PhoenixFDTexmap.
by Hammer Chen
(Click Here to download the sample scene for max 2015)
Do you know you can create photo realistic surface condensation with Phoenix FD? The key is using a procedural texture map - Stucco as a mask for the LiquidSrc.
You could also animate the texture map (i.e., Z offset in this example), with the right timing you could get waterdrop sliding over the fruit surface.
Surface Tension is another key to simulate realistic droplet. The Droplet Breakup parameter controls the balances between the liquid forming tendrils or droplets. For more detail, you could visit Phoenix FD official help page.
by Hammer Chen
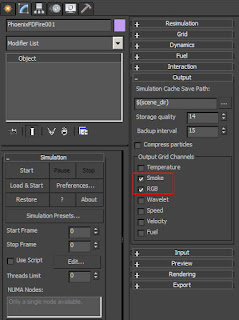
Creating an image-based colored smoke is pretty straightforward with Phoenix FD. Here are three key steps you need to know:
1. Output RGB channel
Check RGB checkbox in the output section

2. PHXSource with RGB checked and plugged in your custom texture map

3. Simulator / Rendering
The default smoke color is based on "constant color," choose Based on "RGB" so you can render out your colorful smoke.


