Variable viscosity
By Hammer Chen, Kristina Gaytandzhieva, Kristin Ivanova
This scene is actually a small test I did back in 2018, for variable viscosity - a new feature of Phoenix 3.10 at the time. I found this scene in my drive while I was looking for my previous works. Some people liked it, so I decided to share how I set up the scene.
Final animation
Scene setup
The simulation setup consists of a highly viscous liquid which is emitted from a teapot.
The emission was masked by using a Stucco texture, so the yellow-slimy liquid seemed to come out from small pores on the teapot. I used the same texture to map the viscosity of the Liquid source. To make the animation more interesting, I assigned a Waveform controller to the Outgoing Velocity of the liquid source. A V-Ray Dome light was used for the lighting, the HDRI is from Chaos Cosmos (Studio 002).
Simulator’s Output
Before you run a fluid simulation, be sure to enable the options shown above in the Output section of the Liquid Simulator. Otherwise, you won’t see the viscous effect on the liquid.
Fluid Source
As a 3ds Max user, a teapot is my go-to geometry when testing a new feature. I used it as my liquid source. Then I masked it with a Stucco texture, so the fluid only emits from the white areas of the texture. This makes it appear as though the fluid is being emitted from tiny pores on the surface of the teapot..
As for the variable viscosity - I used the same Stucco texture to map the viscosity. From hindsight, you can skip mapping the viscosity. You can simply enable the Viscosity option of the LiquidSrc, with the value set to 1.0. It should be enough to achieve interesting results. Or, you can try different procedural textures to map the viscosity.
Preview the Viscosity
If you like, you can preview the viscosity by checking the option "Viscosity" in the Preview section of the Simulator. As you can see in the color-coded particle preview, by mapping the Liquid Source's viscosity with a Stucco map, we can introduce various viscosity simulations inside of the liquid.
Animate the Outgoing Velocity of the LiquidSrc
I assigned a Waveform controller to the Outgoing Velocity of the LiquidSrc. Set the Vertical Bias to Auto > 0. Combine it with the translucent, sub-scattering shader and you’ll make the shot much more fun to watch. This is the most critical step of the scene setup, in my opinion.
Dynamics
Because the liquid runs out so fast, I increased the Steps Per Frame to 2, so we can have a smoother, connected-liquid mesh. I lowered the Gravity to 0.1, so the liquid can emit higher. I also decreased the Time Scale to 0.5 for aesthetic reasons, allowing the viewer to see the effect better.

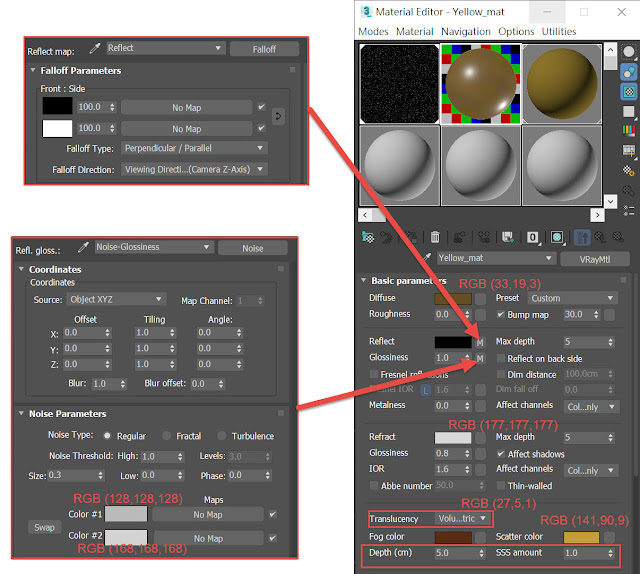
Material for the shitty liquid
It was made with a standard V-Ray material. You can find the material in the downloadable scene file.
Lighting
The lighting is very basic. I used a V-Ray Dome light, the HDRI is from Chaos Cosmos's HDRIs - Studio 002. (Cosmos is a new asset database that comes free with some V-Ray integrations , so I gave it a try).
Download the scene file
Click Here to download the scene file (3ds max 2017). Note that the package does not include the HDRI map. Enjoy!
Tags:
3dsMax
tips & tricks


0 comments