Nuclear Bomb Explosion with Condensation Rings

By Hammer Chen, Kristin Ivanova, Slavina Nikolova
The last blog post “VrayVolumeGrid and Nuclear Explosion” talks about how you can create a nuclear explosion on the ground. But how about a nuclear explosion in a humid sky? In this proof-of-concept setup, I show you how to create nuclear condensation rings with Phoenix, simply by brushing out some smoke from manually arranged Tube geometries. The cloudscape below is also simulated with Phoenix.
How exactly do these condensation rings form? The condensation cloud, also known as a Wilson cloud, is formed by transit water vaporization around the nuclear blast.
“When a nuclear weapon or a large amount of a conventional explosive is detonated in insufficiently humid air, the "negative phase" of the shock wave causes a rarefaction of the air surrounding the explosion, but not contained within it. This rarefaction results in a temporary cooling of that air, which causes a condensation of some of the water vapor contained in it...” Wikipedia
References
I searched for nuclear explosion images on the internet and there are some interesting rings around the nuclear fireball in these photos. Most of the bombs were detonated in the sea, where the humid condition facilitates the formation of condensation clouds.
Overall setup

Let's see how to set the scene. It contains four Fire/Smoke Simulators:
- the nuclear bomb explosion itself that simulates the rings, too (PhoenixFDFire-Nuke),
- the cloudscapes (PhoenixFDFire-Cloud),
- the fog that covers a larger region (PhoenixFDFire-fog),
- and the lower fog (PhoenixFDFire-fog-lower).
Only the PhoenixFDFire-Nuke Simulator and the PhoenixFDFire-Cloud Simulator are actually running the simulation. The other two just have their Volumetric Options tweaked, with no simulation involved.
Let's try to match the real explosion as close as possible. The end result of the simulation fireball is around 520 meters in diameter, which is very close to the size in a reference image.
The nuke explosion serves as a light source in the scene. I don't add any other lights to the environment.
For the PhoenixFDFire-Nuke Simulator:

The Wilson cloud is the main effect we’re trying to reach here. So, how exactly to make it work? I add three Tube geometries to the scene and place them above the fireball. The size of the tubes changes over time and is carefully positioned. These tubes act as Fire/Smoke Sources. Their emission mode is set to Volume Brush. Let's calculate the timing when animating the Volume Brush of each Source (PHXSource-Tube01~03) so that the rings form as if they naturally and sequentially show up at the top of the fireball.
The demonstrated method here is not physically accurate but shows how powerful and artist-friendly Chaos Phoenix is.

he screenshot above shows an animation curve for the PHXSource-Tube01~03’s Brush Effect. This parameter is animated, so that the biggest tube gradually brushes out smoke, then a few frames later, the middle-size tube brushes out smoke. Finally, the smallest tube brushes out smoke. Through such manipulation, the effect of naturally forming water evaporation around the heat of a nuclear explosion can be mimicked.

As for the main explosion, the setup is very straightforward. Two Geospheres are used as emitters in the PHXSource-Nuke Source. The diameter of the bigger geosphere is 60 meters.


From frame 0 to frame 19, the two Source parameters (Temperature and Inject Power) are animated, so that the hot temperature is Volume Injected, starting from 3000.0 kelvin, and dropping to 300.0 kelvin over time. (Note that, a nuclear explosion can release roughly around 100,000,273 kelvin of heat. The temperature set here is not physically accurate. The temperature here is in the range of 3000.0 so that we can re-use the Volumetric Settings – the Gradient Ramp and the Curve, that are well established in previous explosion setups.)
Let's simulate the nuclear explosion with the condensation rings together. Below are the settings for the PhoenixFDFire-Nuke Simulator:

The first thing you’ll notice is the Scene Scale. Lower it down so that the explosion can rise quickly, without giving the source a super high temperature value or smoke buoyancy. For a symmetric mushroom-like explosion, set the Fluidity Method to Direct Symmetric with a Quality of 80. Set the Randomize Amount to 0.1 to introduce some randomness to the simulation. The Steps Per Frame option is set to 2 (you can leave it at 1, but the mushroom cloud rises slightly faster when SPF=2).


Above are the Volumetric Options for the PhoenixFDFire-Nuke Simulator. With the Color Gradient combined with an S-shaped Curve, we can retain most of the details at a higher temperature, avoiding color washout in the explosion shading. These Volumetric Settings are suitable for most types of explosions in general.
For the Cloudscape:
The cloudscape is based on the cloud scene from the official tutorial - Animated Clouds. Follow the tutorial for more detailed, step-by-step instructions. Here the “cloud” is emitted from multiple planes instead of one plane. Let's use the Scatter Compound object in 3ds Max, distributing a plane over another bigger plane. The random rotation and size options allow scattering of the planes quickly. Then set this scatter object as a source. (Standard procedure is the following: set a Shell modified plane and let it emit fluid from one side of its face to ensure the geometry is voxelized correctly. Here we skip the step since we don’t encounter such a problem.)


With the 3ds Max’s Compound-Scatter tool we can scatter a small plane over another bigger plane. The result consists of random Z rotation and Scaling in 168 duplicates of a plane, ready for cloud emission. The compound object allows more flexibility. If we need more clouds, we can simply dial up the Duplicates.


Because the cloudscape is static, only one single cache for the shot is needed. So, let's sim frame 0 to frame 7. Then in the Time Bend Controls, mode is set to Cache Index. Set the Direct Cache Index to 6.0.
Making of the fog
The fog is done by using two Fire/Smoke Simulators. One covers the whole region; the other thicker fog only covers the lower part of the scene. I don’t run any simulation at all, only tweak their Volumetric Settings here.

In the Volumetric Options of the PhoenixFDFire-fog Simulator, set the Smoke Opacity Based On Smoke. In the Opacity diagram, adjust the Y value of the first key point to 0.005. This way we can create a fog volume without actually running the simulation.

Same procedure goes for the PhoenixFDFire-fog-lower Simulator. Set the Y value of the first key point to 0.04 instead.
Camera Settings:

Let's animate the Exposure of the camera, so we can see more detail at the beginning of the explosion. Then back up the exposure a little later. The White balance is set to Daylight so the rendered image goes reddish and matches the reference image better.
Put everything together and render out
When the nuke explosion and the clouds are simulated, we can put everything together and render them out. To see the fog effect clearly, let’s render the image with & without the fog, so to compare them.

The image above is rendered with the Nuke explosion and cloudscapes only, without any fog in the scene.


Let's add another layer of fog called PhoenixFDFire-fog-lower that covers the lower part of the scene. This makes the cloudscape more convincing.

Flicker-free rendering:
Since multiple Simulators are combined in one shot, it can become rather complex volumetric data for rendering. Some flickering may appear in the rendering. In such a case, decrease Volume Light Cache Speedup to 0.1 for every Simulator.

For PhoenixFDFire-Nuke, let's smooth out its temperature data, so it can alleviate flickering in the animation.
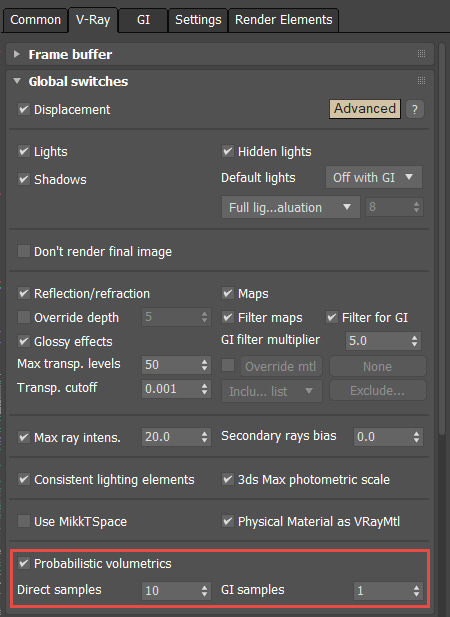
Decreasing the Volume Light Cache can result in long rendering time for some scenes. So, let's turn for help to the Probabilistic volumetrics. Go to V-Ray / Global Switches to enable it. Tune down the parameters for faster rendering. Click HERE for more information. (Note that in older versions of V-Ray, this option was called Probabilistic Shading and resided in the Environment and Effects menu.)

In the Bucket image sampler rollout, set the Max subdivs to 8 (or higher value) for enough sampling.
Post Process & Color Correction

Finally, we add Lens Effects, Exposure and LUT (Plancheite.cube) to the final image in the VFB.
Final animation:
Download the scene file
Click here to download the scene file (3ds max 2018). Note that the package does not include the LUT file.
Tags:
3dsMax
tips & tricks
0 comments